PRODUCT CATEGORY
CONTACT US
- Tel: 0086-311-89642206
- Fax: 0086-311-67906676
- Mobile: 0086-15076331069 13933856228
- E-mail: sales@hbmetals.com
- E-mail: info@hbmetals.com
EN 10253-1 Pipe Fittings: Dimensional Tolerances and End Finish
1. Tolerances on dimension according to EN 10253-1
1) All diameters of EN 10253-1 pipe fittings shall be measured at the welding ends of the fittings. The tolerance is ±1% or ±0.5 mm whichever is the greater.
2) In order to ensure the flow-way area through the fitting is not excessively reduced, the internal diameter(not applicable to dished ends and caps) shall be greater than 80% of the theoretical internal diameter(ID), as calculated by: ID = OD - 2T.
3) Tolerances for ovality are:
at the welding ends: 2%;
on the body for elbows and return bends: 4%.
The ovality(Ov) shall be calculated by:
Ov = 200 * (Dmax - Dmin) / (Dmax + Dmin) in %.
Dmax: maximum measured diameter in one section.
Dmin: minimum measured diameter in one section.
4) Wall thickness tolerances
|
D
|
T
|
Tolerance
|
|
|
mm
|
mm
|
minus
|
plus
|
|
≤406.4
|
≤4
>4 |
-12.50%
|
0.35
|
*D: Outside diameter at the welding end. T: Wall thickness.
*The minus tolerance also applies to the body of the fitting.
5) Tolerances on specific dimensions
|
D
|
F-G-H
|
B
|
C
|
K
|
L
|
|
≤114.3
|
±2
|
±7
|
±7
|
±4
|
±2
|
|
114.3<D≤219.1
|
±2
|
±7
|
±7
|
±7
|
±3
|
|
219.1<D≤406.4
|
±3
|
±7
|
±10
|
±7
|
±5
|
*D: outside diameter;
*F: distance from the axis of the center line to the face of the branch outlet of equal tee.
*G: distance from the axis of the center line to the face of the branch outlet of reducing tee.
*H: Face to center-line distance for 45°.
*B: Face to top distance for 180° return bends.
*C: Center to center distance for 180° return bends.
*K: height of dished ends or caps.
*L: Face to face length of reducers(both concentric & eccentric).
6) Tolerances on the form of fittings
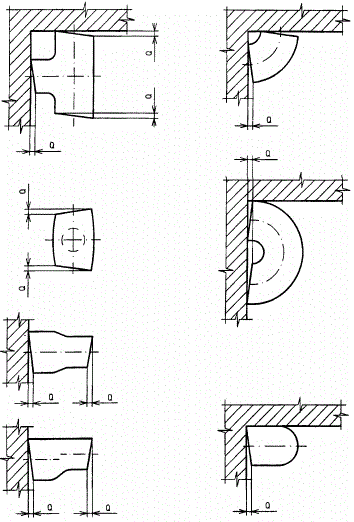
The tolerance on the form of each type of fitting Q = 1% of the outside diameter(D) or 1 mm, whichever is greater. See the figure illustrated below.
2. End finish of EN 10253-1 butt welding pipe fittings
According to DIN EN 10253-1,
for wall thickness T < 3.0 mm, the ends may be plain or slightly chamfered.
for wall thickness T ≥ 3.0 mm, the ends shall be bevelled with an angle of 30 degrees to 35 degrees with a face of 1.6 mm ± 0.8 mm.
The welding ends of EN 10253-1 pipe fittings shall be free from harmful blurs.
Specially, the ends of dished ends with diameter ≥ 159 mm shall be bevelled with an angle of 30 degrees to 35 degrees with a face of 1.6 mm ± 0.8 mm.
Related articles:
EN 10253-1 Pipe Fittings: introduction, chemical composition and mechanical properties.
EN 10253-1 Pipe Fittings: inspection and testing method.
EN 10253-1 Pipe Fittings: marking, coating and packaging.
Views: Author:hbmetals Date:15/07/22


